
Installation Guide
Choose your preferred deployment path: install Sarkan manually on an existing Kubernetes cluster, or deploy the ready-to-run OVA virtual appliance.
1. Prerequisites
Environment Requirements
Before installing Sarkan on a Kubernetes cluster, the administrator must ensure that the environment meets the following requirements:
- Kubernetes: Conformant distribution, version 1.28 or newer
- Architecture: Cluster nodes must use the amd 64 (x86_64) CPU architecture
- Operating System: A modern Linux-based operating system is required (most current distributions are supported)
- Software: Helm version 3.8.0 or newer must be installed, with support for OCI registries
-
Networking Requirements
- DNS rev/for records must be configured for all nodes
- The cluster must have outbound network access to the container registry.indevops.com over port 443
Before proceeding, ensure that the Kubernetes cluster is functioning correctly:
kubectl get nodekubectl get pods -AAll pods across namespaces should be running without errors ✅

Access to Container Registry
Before deployment, access to the private container registry must be requested and approved.
- Registry:
registry.indevops.com
Additional Requirements
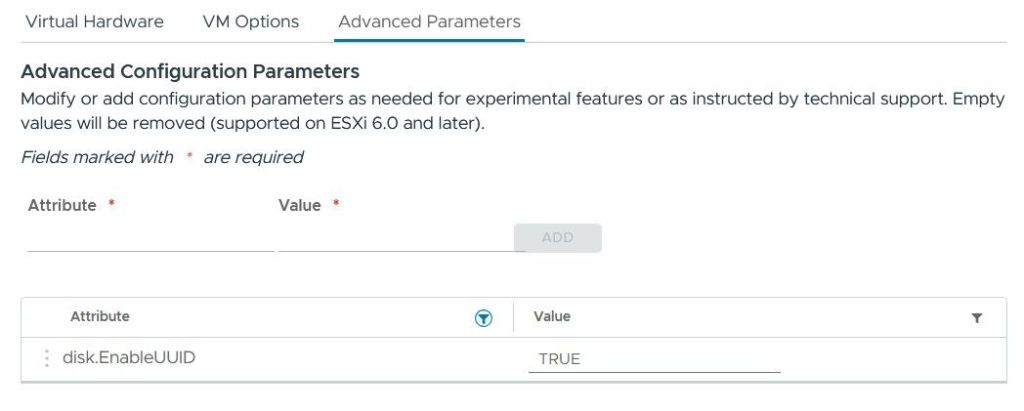
- If deploying on VMware, enable disk UUID (disk.EnableUUID=TRUE). On other hypervisors or physical servers, ensure disk UUIDs are visible in the OS.
To do this:
- Open the virtual machine settings
- Navigate to: VM Options → Advanced → Edit Configuration
Add the following parameter:
disk.EnableUUID = "TRUE"
2. Deployment
Authenticate to Container Registry:
- Log in to the internal container registry using the provided credentials. The client will require valid credentials issued by our team, as well as network access to our container registry.
Authorize to Sarkan's OCI registry using Helm:
helm registry login 'registry.indevops.com'Install HostDisk CSI
- Download the default Helm chart values:
helm show values oci://registry.indevops.com/hostdisk-csi/hostdisk-csi > values.yml-
Edit the
values.ymland configure it to match your cluster and requirements. You will need to configure the registry using valid credentials.
registry:
    hostname: registry.indevops.com
    namespace: hostdisk-csi
    username: YOUR-username
    password: YOUR-password

kubeletPath: /var/lib/kubelet
image:
pullPolicy: Always- Start installation
HostdiskCSI to the Kubernetes cluster
helm install "hostdisk-csi" \\
    oci://registry.indevops.com/hostdisk-csi/hostdisk-csi \\
    --create-namespace -n "hostdisk-csi" \\
-f ./values.yml- Verify that all CSI components are in the Running state
kubectl get all -n hostdisk-csi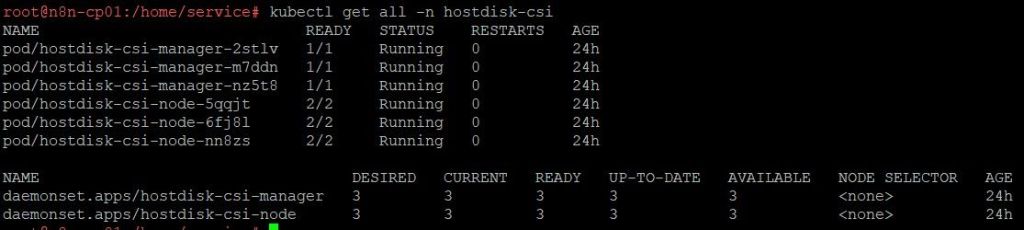
Install SaunaFS Operator
- Download Helm values:
helm show values oci://registry.indevops.com/saunafs-operator/saunafs-operator > values.yml-
Edit the
values.ymland configure it to match your cluster and requirements. You will need to configure the registry using valid credentials.
registry:
    hostname: registry.indevops.com
    namespace: saunafs-operator
    username: YOUR-username
    password: YOUR-password

kubeletPath: /var/lib/kubelet
image:
pullPolicy: always- Start installation
saunafs-operatorto the Kubernetes cluster
helm install "saunafs-operator" \
    oci://registry.indevops.com/saunafs-operator/saunafs-operator \
    --create-namespace -n "saunafs-operator" \
-f ./values.yml- Verify that all pods in the
saunafs-operatornamespace are running
kubectl get all -n saunafs-operator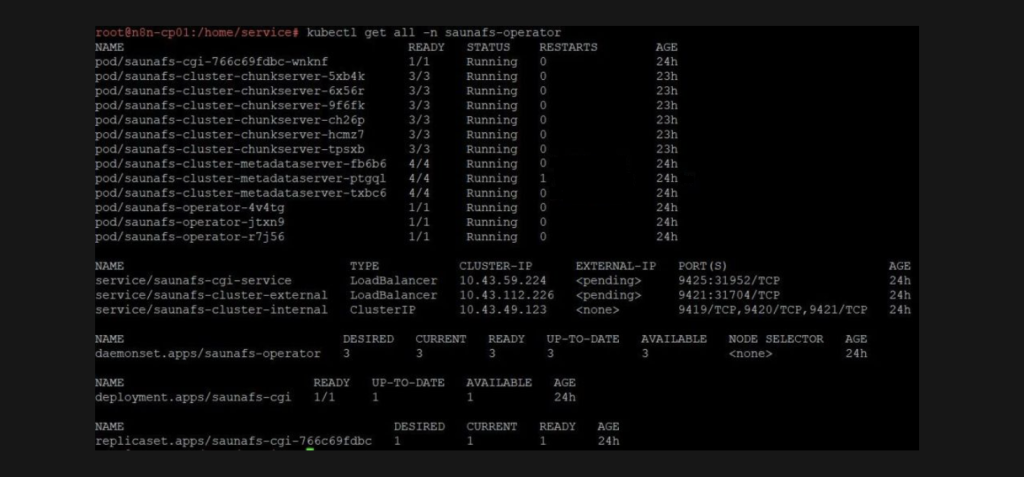
Install SaunaFS CSI
- Download Helm values:
helm show values oci://registry.indevops.com/saunafs-csi/saunafs-csi > values.yml- Edit the
values.ymland configure it to match your cluster and requirements. You will need to configure the registry using valid credentials.
registry:
    hostname: registry.indevops.com
    namespace: saunafs-csi
    username: YOUR-username
    password: YOUR-password

# Path on host machine where SaunaFS volumes will be mounted.
hostMountPath: "/var/lib/saunafs"

kubeletPath: /var/lib/kubelet
image:
pullpolicy: always- Start installation CSI to the Kubernetes cluster
helm install "saunafs-csi" \\
    oci://registry.indevops.com/saunafs-csi/saunafs-csi \\
    --create-namespace -n "saunafs-csi" \\
-f ./values.yml- Verify that all pods in the
saunafs-csinamespace are running
kubectl get all -n saunafs-csi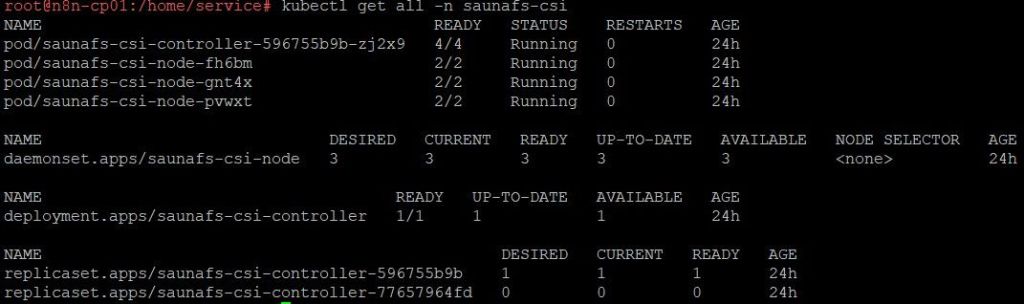
3. Usage
HostDisk Configuration
- Check available disks:
kubectl get hostdisk- This operation formats all discovered HostDisks. Ensure they do not contain data that must be preserved.
kubectl get hostdisks.hostdisk.sarkan.io | grep -v NAME | cut -d " " -f 1 | while IFS= read -r DISK; do kubectl patch hostdisks.hostdisk.sarkan.io $DISK --type merge -p "{\\"spec\\":{\\"format\\":{\\"filesystem\\": {\\"type\\": \\"xfs\\"}}}}"; done- Verify
hostdisksconfiguration
kubectl get hostdisks -o widekubectl get pv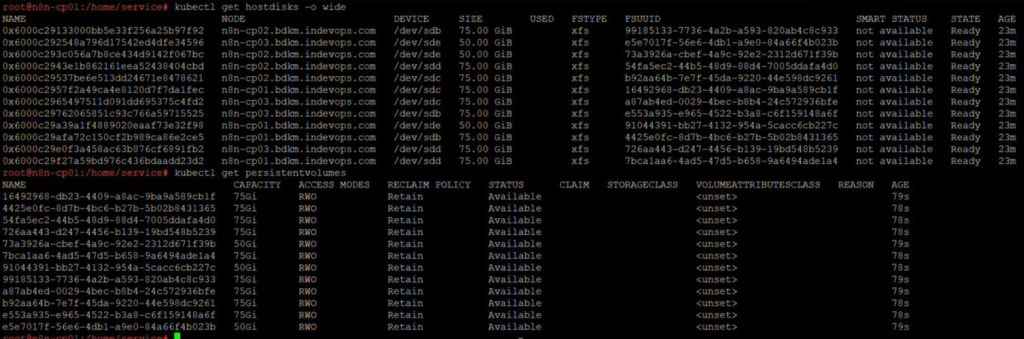
Deploy SaunaFS Cluster
- Create a
saunafs-operator.yamlfile with the following configuration:
apiVersion: saunafs.sarkan.io/v1beta1
kind: SaunafsCluster
metadata:
name: saunafs-cluster
namespace: saunafs-operator
spec:
exposeExternally: true
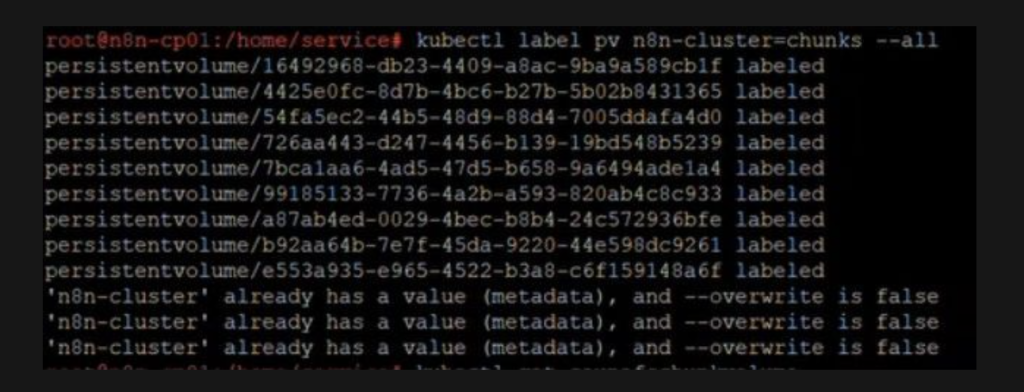
pvSelectors:
metadataStorage: [YOUR-CLUSTER-NAME]=metadata
chunkStorage: [YOUR-CLUSTER-NAME]=chunks
pvcSelectors:
metadataStorage: [YOUR-CLUSTER-NAME]=metadata
chunkStorage: [YOUR-CLUSTER-NAME]=chunks- Apply the configuration to the Kubernetes cluster:
kubectl apply -f saunafs-operator.yaml- Verify that the cluster is correctly deployed:
kubectl get saunafscluster saunafs-cluster --namespace saunafs-operator- SaunaFS volumes creation from persistent volume claims:
- List available PersistentVolumeClaims:
kubectl get persistentvolumeclaims- Add the appropriate label to the PersistentVolumeClaim to designate it for use by Metadata server or Chunkserver:
kubectl label pvc [pvc_name]... [pvc_selector]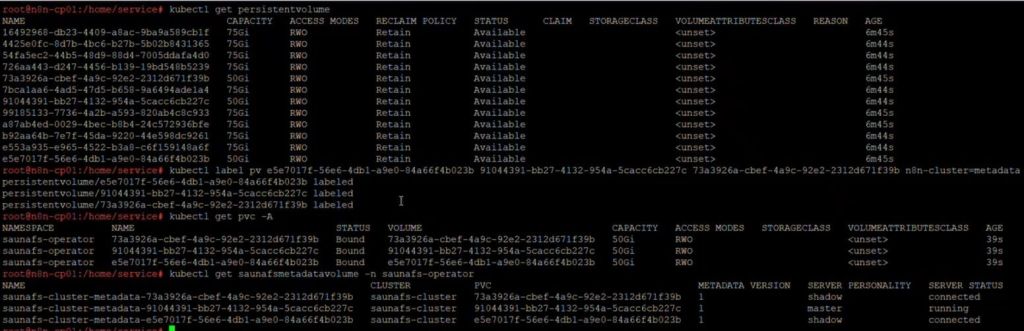

Deploy SaunaFS StorageClass
- Create a YAML file (for example:
storageclass.yaml):
kind: StorageClass
apiVersion: storage.k8s.io/v1
metadata:
  name: saunafs-sc
provisioner: saunafs.csi.sarkan.io
allowVolumeExpansion: true
parameters:
  replicationGoalName: ec21
  trashTime: "0"
  volumeDirectory: "/volumes"
  csi.storage.k8s.io/provisioner-secret-name: [YOUR-CLUSTER-NAME]-root-export
  csi.storage.k8s.io/provisioner-secret-namespace: saunafs-csi
  csi.storage.k8s.io/node-publish-secret-name: [YOUR-CLUSTER-NAME]-root-export
  csi.storage.k8s.io/node-publish-secret-namespace: saunafs-csi
  csi.storage.k8s.io/controller-expand-secret-name: [YOUR-CLUSTER-NAME]-root-export
csi.storage.k8s.io/controller-expand-secret-namespace: saunafs-csi- After creating the YAML file, apply it to the cluster:
kubectl apply -f storageclass.yaml- Verify that the StorageClass has been created:
kubectl get sc -A
1. Prerequisites
OVA Download
The OVA package can be downloaded from our official portals:
- VCF Marketplace webpage
- VCF Automation Portal
OVA specification
- 4 vCPU
- 8 GB RAM
- 7 pre-attached virtual disks (thin provisioned)
The initial OVA deployment consumes approximately:
- ~420 GB raw provisioned storage (thin-provisioned on datastore)
This includes:
- 1 system disk (~100 GB)
- 6 data disks (50–60 GB each)
After deployment, the administrator can extend both compute and storage resources depending on workload requirements.
Network requirements (DNS + IP allocation)
-
Two static IP addresses must be reserved:
- VM management IP – assigned to the node VM
- Application ingress IP – used by applications deployed via OVA
- DNS rev/for records must be configured to both IP addresses
Additional Requirements
-
If deploying on VMware, enable disk UUID (disk.EnableUUID=TRUE).
On other hypervisors or physical servers, ensure disk UUIDs are visible in the OS.
To do this:
- Open the virtual machine settings
- Navigate to: Edit Settings → Advanced Parameters
- Add the following parameter:
disk.EnableUUID = "TRUE"
2.Deployment
Sign in to the VMware vSphere Web Client
Right-click the target resource and select Deploy OVF Template
In Deploy OVF Template, click Select an OVF template provided by us, and then click Next
In the Customize template step, configure the virtual machine settings:
- Configure the network settings (IP address, subnet mask, gateway, DNS)
- Set the password for the default user (default username: Sarkan)
- Select additional applications to be installed by checking the appropriate options.
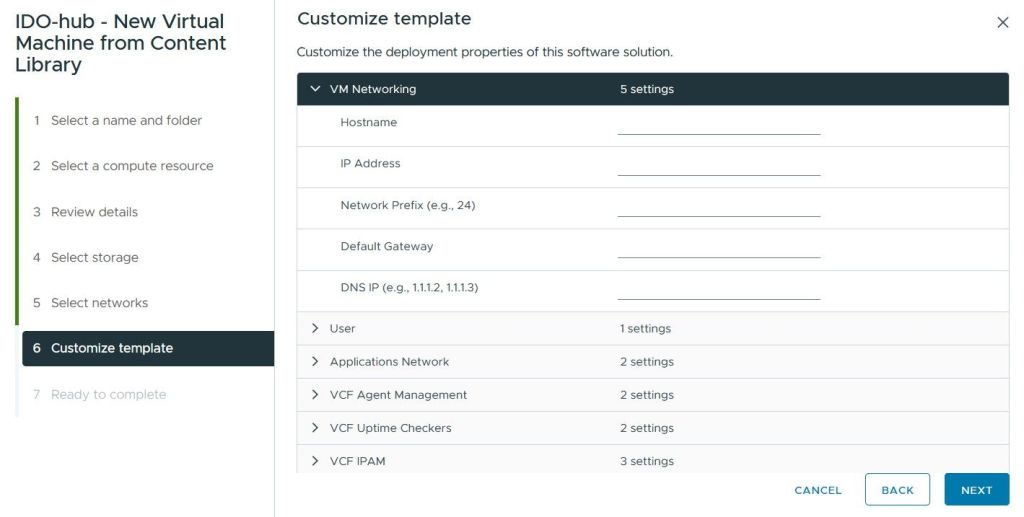
In Ready to Complete, review the deployment, then click Next
Wait for the deployment to complete then click the Power on button on the INDEVOPS Sarkan virtual appliance
After the deployment is complete, log in to the virtual machine via SSH using the configured credentials.
Verify that the Kubernetes cluster and workloads are running correctly:
- Check cluster nodes:
kubectl get nodesEnsure that all nodes are in the Ready state.
- Check running pods:
kubectl get pods -A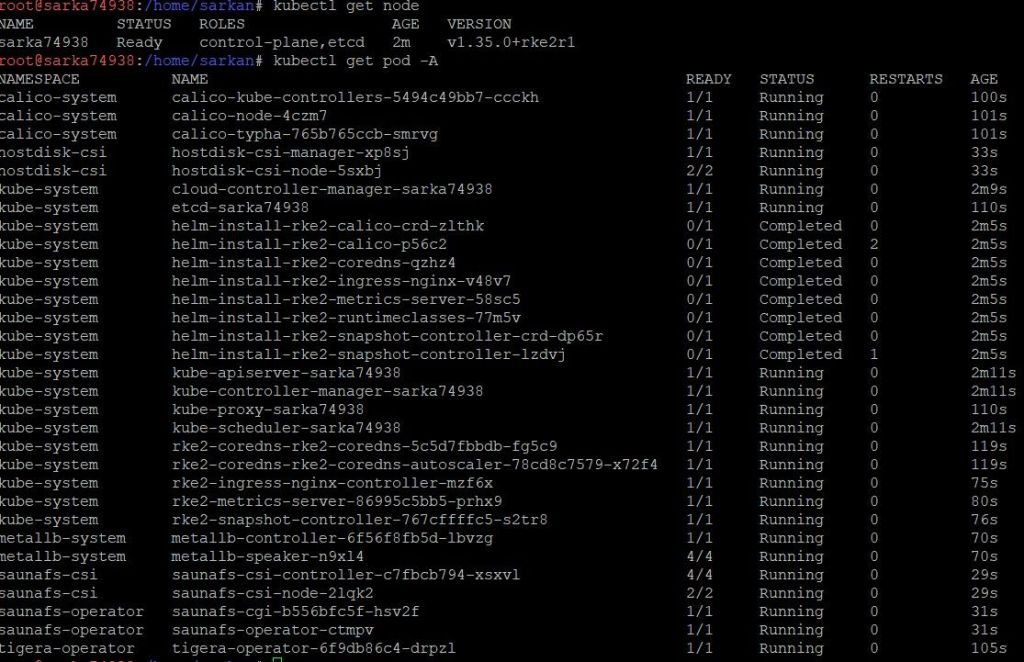
Verify that all pods are running and there are no errors.
- Check persistent storage:
kubectl get saunafscluster -A
Get your license today
Contact our team and unlock Open Source Sarkan today.